If you’re new to 3D printing, one of the most important tools you’ll use is your slicer. A slicer converts 3D models into instructions your printer can follow. Orca Slicer, a free and open-source software built on PrusaSlicer and Bambu Studio, is one of the most powerful and user-friendly options available today.
Whether you just installed Orca Slicer or are looking to improve your first prints, this beginner’s guide will walk you through the first 10 steps to achieve perfect 3D prints.
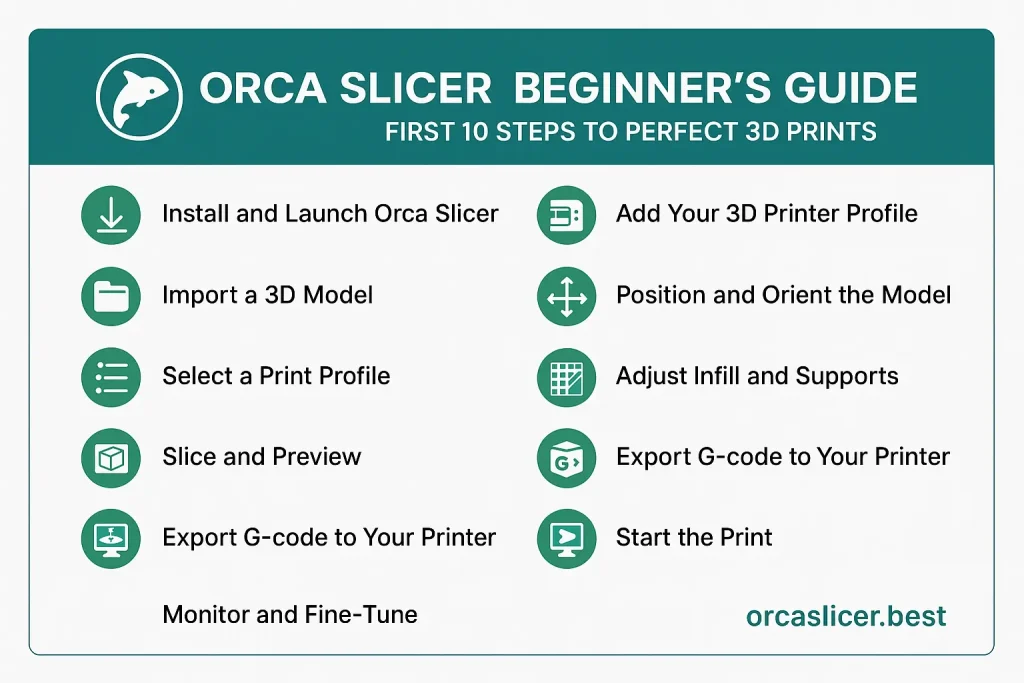
1. Install and Launch Orca Slicer
Start by downloading the latest version of Orca Slicer for Windows, macOS, or Linux. After installation, launch the application. The setup wizard will guide you through the initial configuration, so even first-time users can get started easily.
2. Add Your 3D Printer Profile
Orca Slicer comes with a variety of pre-configured printer profiles. Select your model from the list, or set up a custom printer by entering details like build volume, nozzle size, and filament diameter. Correct printer settings are the foundation of reliable prints.
3. Import a 3D Model
Click the Add Model button to load your first 3D file. Orca Slicer supports STL, 3MF, OBJ, and STEP formats. The model will appear on the build plate inside the slicer, ready to be positioned and sliced.
4. Position and Orient the Model
Correct model placement saves time and improves quality. Use the move, rotate, and scale tools to adjust orientation. Position flat surfaces on the print bed to improve adhesion and reduce the need for supports.
5. Select a Print Profile
For beginners, Orca Slicer offers pre-made print profiles such as Draft, Standard, or High Quality. These profiles automatically adjust layer height, infill, and speed to balance print quality and efficiency. As you gain experience, you can create and save custom profiles.
6. Adjust Infill and Supports
Infill controls the internal strength of your model. For decorative pieces, a low infill (10–20%) works well, while functional parts may require 40–60% or more. Enable supports for overhangs or complex geometries. Orca Slicer also includes paint-on supports for precise control.
7. Slice and Preview
Click the Slice button to generate the G-code. Before exporting, use the Preview Mode to review print layers, estimate material usage, and check print time. This step helps spot issues like missing supports or weak walls before printing.
8. Export G-code to Your Printer
Once satisfied with the preview, save the G-code to an SD card, USB drive, or send it directly to your printer if connected via Wi-Fi. Orca Slicer makes it easy to transfer files regardless of your setup.
9. Start the Print
Insert the SD card or USB into your 3D printer and select the file to begin printing. If connected via Wi-Fi, you can start the print directly from Orca Slicer. Double-check that your print bed is leveled and preheated before starting.
10. Monitor and Fine-Tune
Orca Slicer includes remote monitoring features that allow you to track print progress, pause, or stop prints if necessary. For long prints, this feature provides peace of mind. As a beginner, use early prints to experiment with settings like temperature, retraction, and speed to fine-tune results.
Final Thoughts
Getting started with Orca Slicer is simple, but mastering it takes practice. By following these 10 beginner-friendly steps, you’ll build a strong foundation for reliable and high-quality 3D prints.
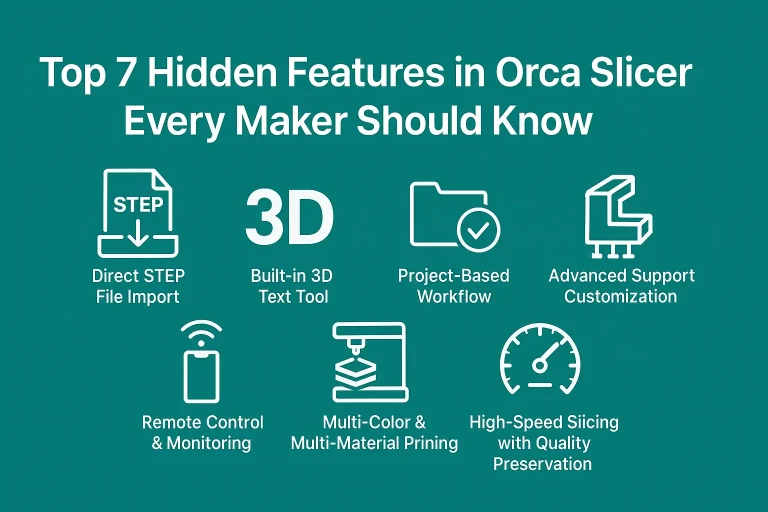
From installing the software to slicing and monitoring your first job, Orca Slicer provides all the tools you need in one open-source package. As you grow more confident, you can dive into advanced features like multi-color printing, STEP file import, and project-based workflows.
👉 Remember: every great 3D print begins with the right slicer setup. Download Orca Slicer today, follow these steps, and start your journey to perfect prints.